

Three essential tube amp tools
by Mark ~ April 8th, 2008. Filed under: Tools.This post should probably be sub-titled: “That you can’t buy at DigiKey or Mouser,” although some of the parts can be sourced from them. None of these tools are expensive, all are incredibly useful.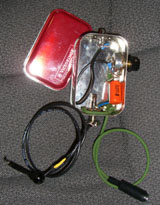
- A chopstick (Non-conductive… bamboo or plastic please! The metal ones from Korea are definitely out!).
- The other chopstick, rigged with a 100k 5W resistor so that one end of the resistor is at the tip and formed into a probe, the other side of the resistor is connected to a flexible wire with an alligator clip that can be grounded to the chassis.
- An amplifier stethoscope… also homemade (see below). Not the Doctor’s kind.
A Chopstick (Hashi)
In tube amps you will often find yourself dealing with an intermittent problem, some inexplicable micro-phonic issue or squeals and other effects of instability in the circuit itself. You end up resorting to debugging with the amp power on. In this situation a simple, non-conductive, chopstick is a very useful tool. With the chopstick you can poke and prod connections to check for intermittent problems, lightly tap components, tubes, wires, etc. listening for a micro-phonic component or connection and you can use the flexible yet strong stick as a wire forming tool to make the minor adjustments in lead dress to improve stability or get rid of a squeal.
- Poking and prodding can quickly locate cold solder joints or loose socket connections.
- Tapping can point out a micro-phonic tube or component or connection that may manifest itself in particularly ugly ways at high volume (did you know those Mallory 150’s are fairly micro-phonic? One of the reasons I prefer the epoxy coated ‘orange drop’ capacitors).
- Lead dress is very important and often subtle changes can make a big improvement in your amplifier. If you find yourself working on a Trainwreck-inspired amplifier you’ll certainly be making small adjustments to your lead dress, otherwise you aren’t pushing the envelope enough.
Capacitor Discharge Probe (the 2nd chopstick)
The second chopstick can be used as a handle for a resistor probe to let you discharge capacitors in the amplifier after it is powered off. The DC Reservoir capacitors in an amplifier can hold lethal voltages and energy sufficient to kill for hours and days after the amp is turned off. A 100K ohm 5W resistor connected to ground provides a safe way to quickly discharge the capacitors without a big spark and the device can be left grounded and ready on your bench for each time you cycle the power off. Be sure to insulate all the connections leaving only the ‘probe tip’ exposed to discharge the caps.
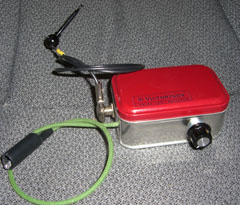
An Amplifier Stethoscope
Doug Hoffman coined the term ’stethoscope’ for a dedicated listening amplifier that he documents in the tools section of his EL34 World Site: see the Stethoscope Posting. AmpGeek on the AmpGarage Forum brought it to the attention of that community in this post.
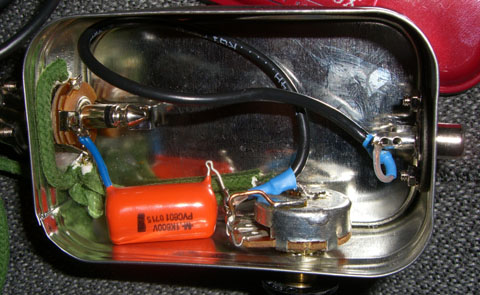
The basic idea of the amp stethoscope is to provide an insulated, shielded probe (like a mini-clip connected to the center conductor of a length of coax), coupled through a large value, high voltage DC blocking capacitor (like a 0.1uF 630V Orange Drop) into a 1M ohm potentiometer and then route the output wiper of the pot into a listening amplifier (a good, general purpose audio amp with a fairly wide-range, high quality monitor speaker… I use a Luxman suck-face receiver and a Mission 70 bookshelf speaker… almost anything will do).
With this setup the DC is decoupled (blocked) from any audio signal on a probed point so you can actually listen to the hum on your DC supplies if you’d like! The potentiometer lets you lower the signal into the listening amplifier to a safe level (typical tube amp voltage swings could destroy the front-end of the listening amplifier) and gives you a control close to hand when you are probing the tube amp (you’ll probably want to adjust the potentiometer to a very low setting when you first probe a new node and increase the volume gradually). The input impedance is fairly high so you can (generally) probe even the most sensitive nodes in your amp with little direct effect. The flexibility to probe anywhere is the cool factor for this tool… you can use it to isolate an audio problem to one specific node of a tube stage. One recommendation… discharge the probe to ground when switching between test points as a large DC charge can build up and make a shocking pop sound in your monitor as you probe multiple points.
When I was struggling with an Inter-modulation distortion problem (IM) in my BluesMaster build this tool kept me from tearing my hair out over the issue, and helped me resolve to make a change that I wasn’t in favor of… if anything I waited too long before giving it a try. The cause of the problem wasn’t intuitive to me and the stethoscope provided some enlightenment for me on tube circuits in general, but I’m sure I’ll be posting the whole saga for you later…


July 7th, 2009 at 3:30 pm
[...] TubeNexus article on useful tools for your amp. *= 0 [...]
March 17th, 2010 at 6:58 am
Hello! I want to say thanks for an interesting site about a subject I have had an interest in for a long time now. I have been lurking and reading the posts avidly so just wanted to express my thanks for providing me with some very good reading material. I look forward to more, and taking a more active part in the discussions here.
September 28th, 2010 at 12:10 am
The Amplifier Stethoscope is a great idea. I will have to construct one of these for myself.